
Project FEZZ-STEN-STIEN
2 posters
Page 1 of 1

Project FEZZ-STEN-STIEN
![]() by The Bishop Tue May 22, 2012 10:48 am
by The Bishop Tue May 22, 2012 10:48 am
FORD FIESTA Mk3.5 RS1800
a.k.a Project. "FEZZ-STEN-STIEN"
For those of you who dont know, read below, for those of you that do "I KNOW!!!!!!!"
MY Dad Left me my RS1800 Mk3.5 Fezz, When he died, She Blew her Head Gasket 15.1 Miles From Donny in 2007. Since then she Aint been out much, Follow Her excessively Lonng Progress Back to life.
Thanks to all that have Helped and Thanks to The Original EMC for pissing me off and making Me work on her!! x x x you my insperation and my DAD is my reason!
This Ride is for You OLD MAN!!!!! RIP!

The Bishop- Posts : 91
Join date : 2012-05-22
Age : 48
Location : South Wales -

Re: Project FEZZ-STEN-STIEN
![]() by The Bishop Tue May 22, 2012 10:49 am
by The Bishop Tue May 22, 2012 10:49 am
As She Was When I First Got Her.
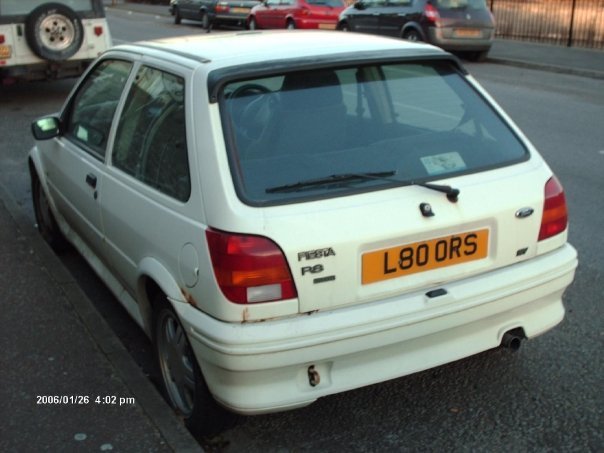


When I first got her, she was compleatly standard apart from Aftermarket Headunit and Private Plate. Even the wheels are the original RS 15's and the Recaro interior was in mint condition.
My Dad Passed away in January 2006 and he left me the choice of 2 cars in his will, I will post pics of the other one in another post, but I chose the Fezz and have never regretted it. I Love this car and will never sell her. Alot of people tell me it is a lost cause, or its a crappy 130 bhp Ford, its just a fiesta. This is more than a car to me, we have a connection and a relationship (Cheese), The Original EMC used to to say, "I Know That you will never cheat on me, if I cant find you, You are most likely under your car".
This is a long project because I want to get it right, I wont rush or just do it so that it is done. She wont come out untill she is ready.
I hope you enjoy the progress as I post it up and, and lets hope it doesnt take me another 5 yrs to get her finished.
Oh in case you are wondering, she is an M Reg originaly 1995, she was one of the last RS1800 Produced.
The Bishop
The Bishop- Posts : 91
Join date : 2012-05-22
Age : 48
Location : South Wales -
Re: Project FEZZ-STEN-STIEN
![]() by The Bishop Tue May 22, 2012 10:50 am
by The Bishop Tue May 22, 2012 10:50 am
The First Build 2006/07

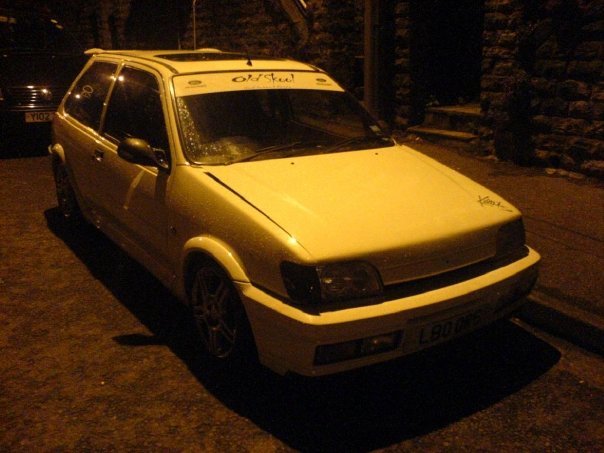


First Buid; This was 2006/07 when I was working in Llantwit Major, not any major mods to her really.
Second Hand Fox 5 spoke alloys with 195/45/15 Rubber.
A Mondeo Estate roof Spoiler (will do a How 2 for this).
3" Stainless Steel Slash cut Backbox.
Raised Bonnet.
Induction kit.
Few Graphics.
Custom Tinted Front Flashers and Rear Clusters so the rear had Arrows pointing when you were turning.
There was a Sub And Amp fitted (see the How 2 - Amp fitting 101) but nothing special.
Lastly M3 style Carbon effect mirrors with flush fitted Side repeaters (will do a How 2 for this as well).
I was working so much on split shifts, that i didnt have much time to work on her, and my boss banned me from working on her during my spilt. Bigger mods came in the next burst, Just prior to the infamous "DONNY 07" trip.
The Bishop- Posts : 91
Join date : 2012-05-22
Age : 48
Location : South Wales -
Re: Project FEZZ-STEN-STIEN
![]() by The Bishop Tue May 22, 2012 10:51 am
by The Bishop Tue May 22, 2012 10:51 am
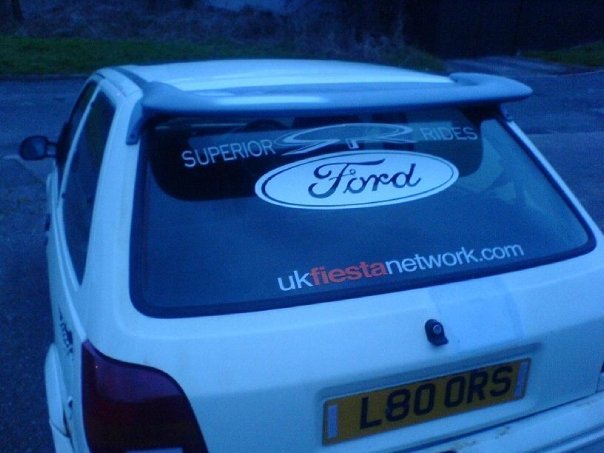
The Ever Changing Rear Window Graphics.


The Bishop- Posts : 91
Join date : 2012-05-22
Age : 48
Location : South Wales -
Re: Project FEZZ-STEN-STIEN
![]() by The Bishop Tue May 22, 2012 10:52 am
by The Bishop Tue May 22, 2012 10:52 am
Second Build 2007


Started to get a bit more moddy at this stage.
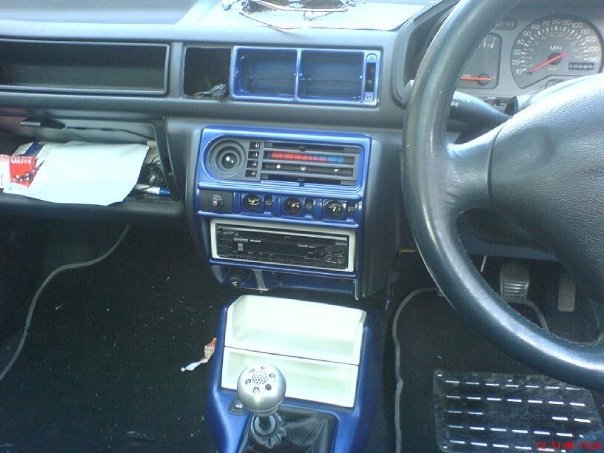
Interior
Interior was Clolour coded with Seat Imperial Blue Pearl for dash surrounds.
Custom door cards were built, using MDF (will do a HOW 2) and speakers were replaced with JBL Composites.
New Head Unit was fitted, a 7" tft touch screen flip out DVD player.
Playstation 2 was fitted in the Glove box and connected to headunit.
In the space above the glove box was a Sagem Freeview TV Box.
Power inverter and Scart Switch box fitted under Glove box.
Exterior
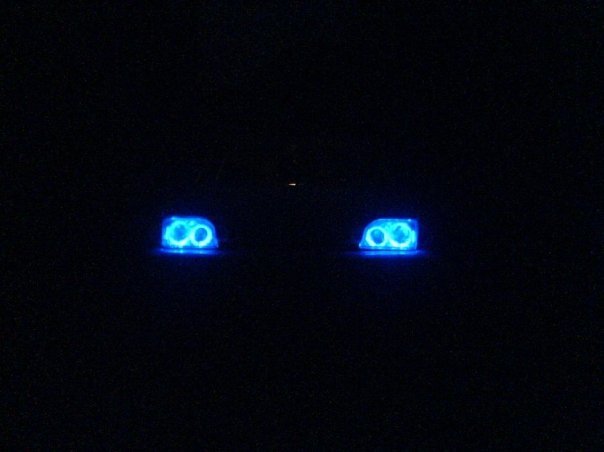
Aftermarket Direct Fit Headlights with Twin Blue Halo's Fitted and put on a seperate switch.
Boot Wiper arm and motor removed, tailgate flushed and rust protected.
Front bumper was smoothed on upper swageline and Resprayed in Ford Frozen White.
Chassis
A Gmax 30mm Lowering Kit Fitted All round. (will do How2)
New Wishbones on the Front.
I will envevour to write as many "How 2's" as I can for these jobs, so you can have a reference for any projects you may be doing, So please feel free to PM me if there is anything you need help on or a specific How 2 if it hasnt been done.
The work on the Engine will be covered in the next Update, as it was a major part and I cant find the Pics at the miniute
Thanks for Reading
The Bishop
Started to get a bit more moddy at this stage.
Interior
Interior was Clolour coded with Seat Imperial Blue Pearl for dash surrounds.
Custom door cards were built, using MDF (will do a HOW 2) and speakers were replaced with JBL Composites.
New Head Unit was fitted, a 7" tft touch screen flip out DVD player.
Playstation 2 was fitted in the Glove box and connected to headunit.
In the space above the glove box was a Sagem Freeview TV Box.
Power inverter and Scart Switch box fitted under Glove box.
Exterior
Aftermarket Direct Fit Headlights with Twin Blue Halo's Fitted and put on a seperate switch.
Boot Wiper arm and motor removed, tailgate flushed and rust protected.
Front bumper was smoothed on upper swageline and Resprayed in Ford Frozen White.
Chassis
A Gmax 30mm Lowering Kit Fitted All round. (will do How2)
New Wishbones on the Front.
I will envevour to write as many "How 2's" as I can for these jobs, so you can have a reference for any projects you may be doing, So please feel free to PM me if there is anything you need help on or a specific How 2 if it hasnt been done.
The work on the Engine will be covered in the next Update, as it was a major part and I cant find the Pics at the miniute
Thanks for Reading
The Bishop
The Bishop- Posts : 91
Join date : 2012-05-22
Age : 48
Location : South Wales -
Re: Project FEZZ-STEN-STIEN
![]() by The Bishop Tue May 22, 2012 10:53 am
by The Bishop Tue May 22, 2012 10:53 am
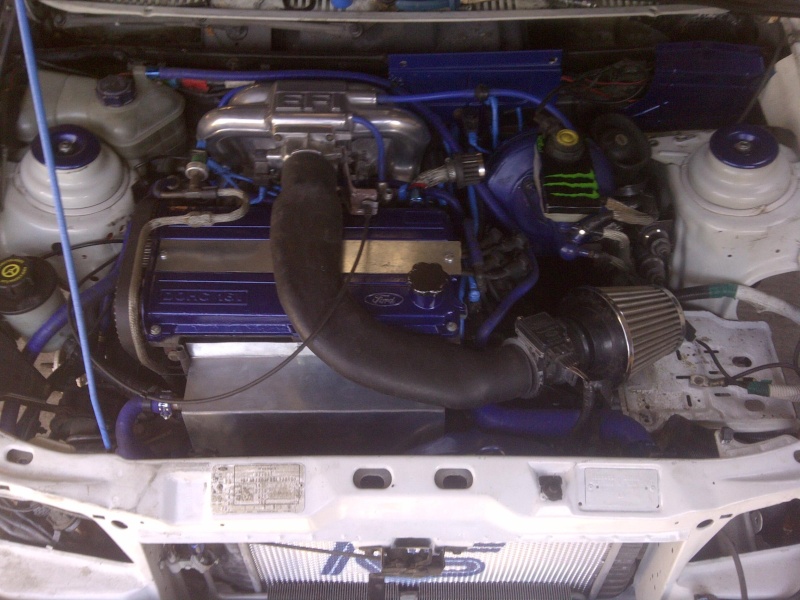
Engine: 2007 - Present
As Stated before the Headgasket blew 15.1 Miles short of Castle Donnington in 2007. Since then, lots of work. We were traveling to the Donny show, I ended up arriving on a lowloader into the camp site (very funny). I spent the entire weekend sourcing parts and tools to replace the gasket. Amazingly we found a full Gasket kit for £10-00 and beg borrowed and stole tools etc. Stripped the engine and rebuilt it, in the middle of the circuit on the SR Club Stand.
Unfortunately, on the saturday night, the car had been moved without my knowledge. Since I had marked up the timing on the cams and not the block this caused me a problem. Once rebuild we went to start her up, and bent all the valves. Turns out that whe it was moved, the crank moved and because I have marked up the cams, the Timeing was 3 teeth out.
So after a long wait and a lowloader from Loughbourgh to Barry, I swapped the heads on the engine and started again, however it was the start of a long list of problems, Cat went, for one plus lots more issues. Which is the main reason the car has been off the road for so long.


I knew the Build was going to take a while and began a full overhaul. Engine was looking sorry for its self.
One of the problems we had was, the new head we had fitted was from a 115 bhp Mondeo engine and not a 130 bhp lump as we had been told, this caused problems with the fuel management and ECU. Once we had discovered this we simply swapped the 115 Cams for the original 130 Cams. Because the engine was being stripped, I took the chance to tart up the engine bay a bit whilst we did the work.
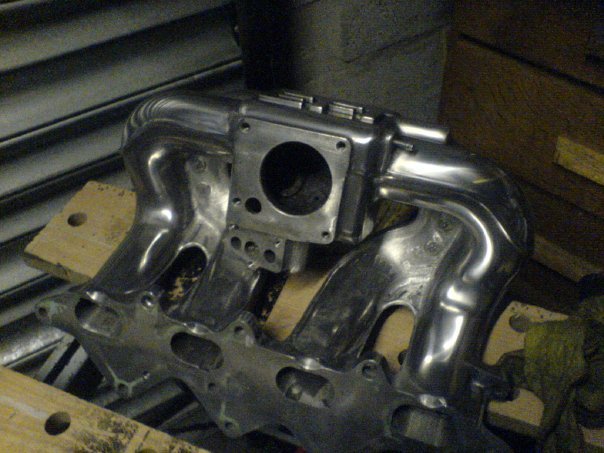
First job was to Muck about with the EFI Manifold.

As you can see from the above pic, it was looking very tired and needed a Makeover. It is one of the first things you see when you open the bonett, so I wanted it to be a bit special. Considering I did all the work by hand, I am quite proud of the finished article. I decided to Polish it up. This took alot of sanding and polishing over a couple of weeks. You see the difference, I had an original Manifold spare and took a before and after pic to show the difference.


Once I fitted the EFI, I realised the Rest of the engine now needed work. I ended up painting the Rocker cover, Brake Master, Fan surround and a few other bits. I think it looks a thousand times better.

Loads more to do yet.
Thanks for Reading
Happy Modding
The Bishop.
As Stated before the Headgasket blew 15.1 Miles short of Castle Donnington in 2007. Since then, lots of work. We were traveling to the Donny show, I ended up arriving on a lowloader into the camp site (very funny). I spent the entire weekend sourcing parts and tools to replace the gasket. Amazingly we found a full Gasket kit for £10-00 and beg borrowed and stole tools etc. Stripped the engine and rebuilt it, in the middle of the circuit on the SR Club Stand.
Unfortunately, on the saturday night, the car had been moved without my knowledge. Since I had marked up the timing on the cams and not the block this caused me a problem. Once rebuild we went to start her up, and bent all the valves. Turns out that whe it was moved, the crank moved and because I have marked up the cams, the Timeing was 3 teeth out.
So after a long wait and a lowloader from Loughbourgh to Barry, I swapped the heads on the engine and started again, however it was the start of a long list of problems, Cat went, for one plus lots more issues. Which is the main reason the car has been off the road for so long.
I knew the Build was going to take a while and began a full overhaul. Engine was looking sorry for its self.
One of the problems we had was, the new head we had fitted was from a 115 bhp Mondeo engine and not a 130 bhp lump as we had been told, this caused problems with the fuel management and ECU. Once we had discovered this we simply swapped the 115 Cams for the original 130 Cams. Because the engine was being stripped, I took the chance to tart up the engine bay a bit whilst we did the work.
First job was to Muck about with the EFI Manifold.
As you can see from the above pic, it was looking very tired and needed a Makeover. It is one of the first things you see when you open the bonett, so I wanted it to be a bit special. Considering I did all the work by hand, I am quite proud of the finished article. I decided to Polish it up. This took alot of sanding and polishing over a couple of weeks. You see the difference, I had an original Manifold spare and took a before and after pic to show the difference.
Once I fitted the EFI, I realised the Rest of the engine now needed work. I ended up painting the Rocker cover, Brake Master, Fan surround and a few other bits. I think it looks a thousand times better.
Loads more to do yet.
Thanks for Reading
Happy Modding
The Bishop.
The Bishop- Posts : 91
Join date : 2012-05-22
Age : 48
Location : South Wales -
Re: Project FEZZ-STEN-STIEN
![]() by The Bishop Tue May 22, 2012 10:53 am
by The Bishop Tue May 22, 2012 10:53 am
Ok Started To work on Fezz again now that I have cleaned out the garage. Today was spent on removing the Off side front wing. This is due to the fact that the Arch Bishop of Cantabury aint as HOLY as my front wing.
Here is how we started.
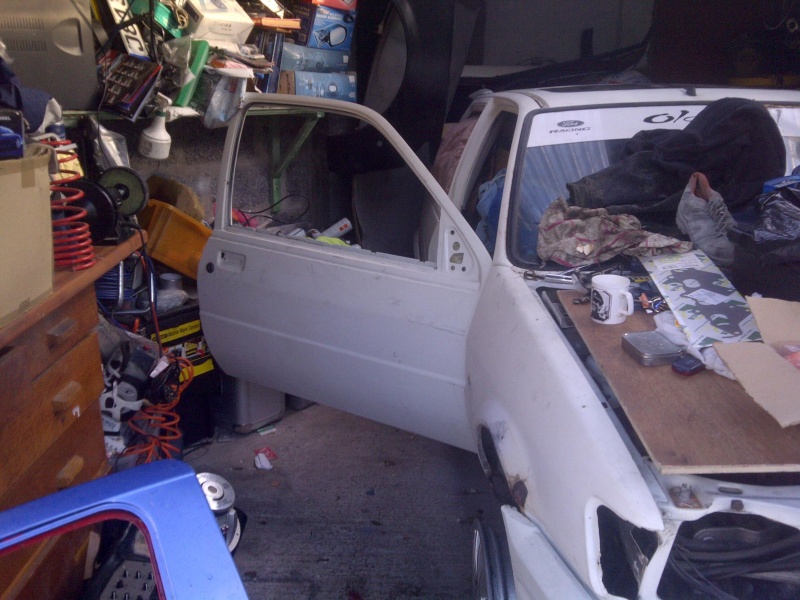
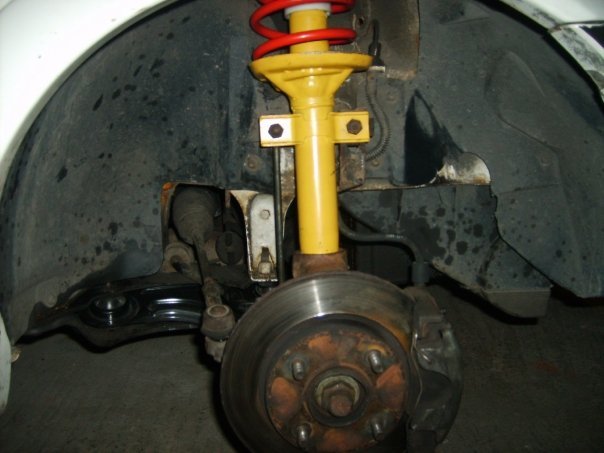
First thing I wanted to do was remove the Suspension Strut, This was to give a bit more access to the wing and firewall. Also I Needed to get the Hub and Caliper off to Overhaul them and replace discs and pads.
If you follow the "HOW 2" you will be fine. it is slightly diffrent for the Fezz but pretty similar.

With the Strut off, I fitted the New Poly Bush to the top of the tower and replaced the Anit rollbar bush with a polly as well. Will do a "How 2" on this one later.


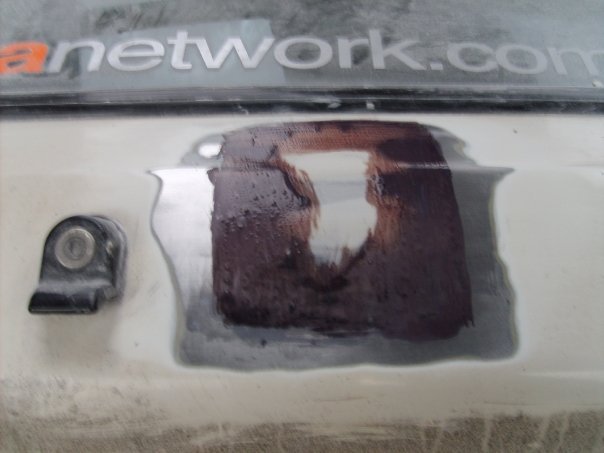
Next up was to get the Rotten Wing off. Use a chisle around the edges and drill out the spot welds. dont rush and you will be fine, there are also two 10mm Bolt inside the wing that connect to the door jam.


This is what I found underneath. I though I was gonna need to do alot of welding. Luckily after a bit of wirebrush work and some extensive cleaning, I discovered it was only surface rust. So i stuck some rustola on and the sealed it with good old White hammerite. couple more coats and she should be good to run.


Next job is strip the calliper and hub and overhaul like on Project Bender. Also while doing this job, realised that the brake lines will need replacing and since I already have Goodrich Braided hoses to fit, I might aswell replace the lines as well.
Thanks for Reading.
Here is how we started.
First thing I wanted to do was remove the Suspension Strut, This was to give a bit more access to the wing and firewall. Also I Needed to get the Hub and Caliper off to Overhaul them and replace discs and pads.
If you follow the "HOW 2" you will be fine. it is slightly diffrent for the Fezz but pretty similar.
With the Strut off, I fitted the New Poly Bush to the top of the tower and replaced the Anit rollbar bush with a polly as well. Will do a "How 2" on this one later.
Next up was to get the Rotten Wing off. Use a chisle around the edges and drill out the spot welds. dont rush and you will be fine, there are also two 10mm Bolt inside the wing that connect to the door jam.
This is what I found underneath. I though I was gonna need to do alot of welding. Luckily after a bit of wirebrush work and some extensive cleaning, I discovered it was only surface rust. So i stuck some rustola on and the sealed it with good old White hammerite. couple more coats and she should be good to run.
Next job is strip the calliper and hub and overhaul like on Project Bender. Also while doing this job, realised that the brake lines will need replacing and since I already have Goodrich Braided hoses to fit, I might aswell replace the lines as well.
Thanks for Reading.
The Bishop- Posts : 91
Join date : 2012-05-22
Age : 48
Location : South Wales -
Re: Project FEZZ-STEN-STIEN
![]() by The Bishop Tue May 22, 2012 10:54 am
by The Bishop Tue May 22, 2012 10:54 am
Loads More to come will post soon.
The Bishop- Posts : 91
Join date : 2012-05-22
Age : 48
Location : South Wales -
Re: Project FEZZ-STEN-STIEN
![]() by The Bishop Wed May 23, 2012 6:04 am
by The Bishop Wed May 23, 2012 6:04 am
Finally I have had some time to myself / Not building a customer car or rebuilding VANMANS (love you). So I have had a good push at getting the fezz back on track. All of the current work is front end, as I can see the back end yet. Hope you enjoy this thupdate.
So after the wing fitting and underseal of arches, I moved back into the engine bay. Stated off by cleaning up the Gear box.

As you can see, once I had soaked it in "GUNK" and panel wipe, I got out my mums Steam cleaner that she uses for the curtains (lol) and steam cleaned it all off. Then good old "HAMMERED BLACK HAMMERITE" couple of coats, and it looks as good as new.

I also gave the clutch arm a polish for good measure.
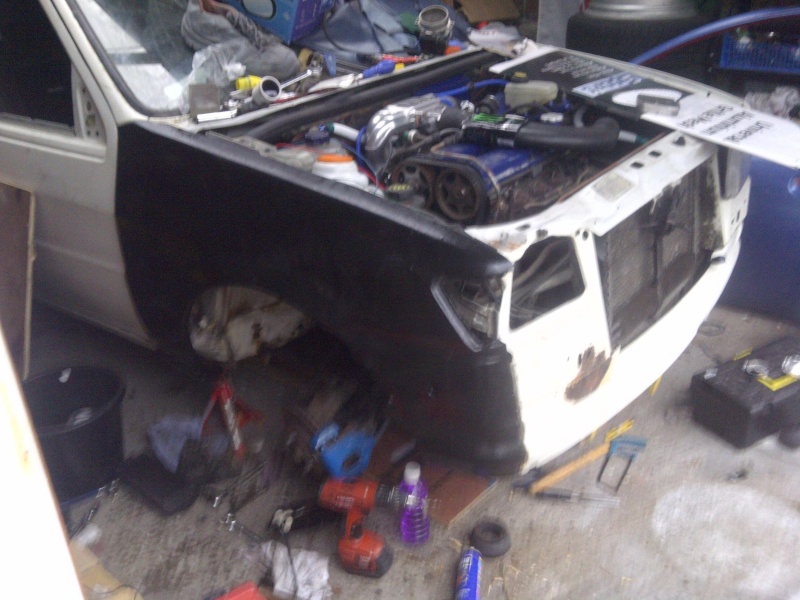
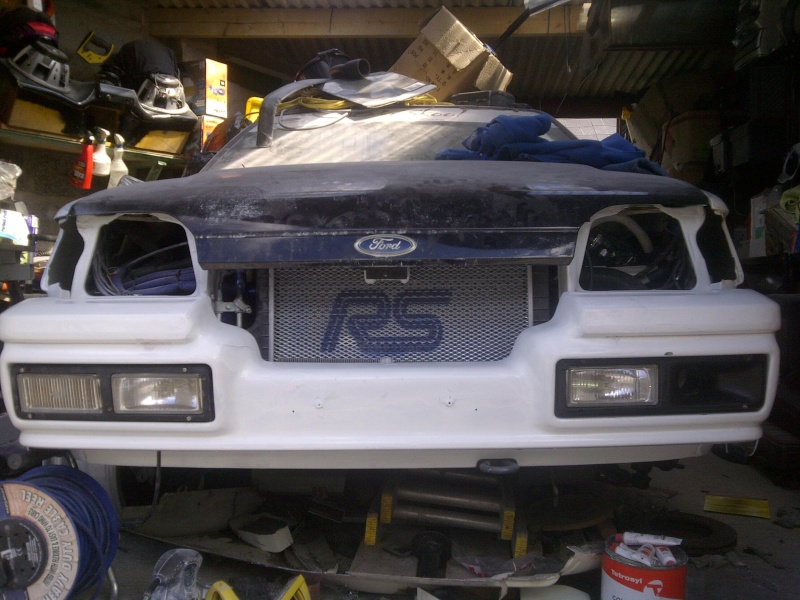
Nextup! Came the Air Flow. One of the problems I used to have was overheating, so along with the bonnet raisers and vent I wanted to get extra air into the engine bay.

as you can see, with the bonnet shut there is very little air flow to the radiator and oil cooler. So I got all gumpy about it and took out the angle grinder. Now there is plenty of air flow.

Once cut I needed to make it look a bit better, so wire meshing bondo and fibre glassing, alot of sanding and shaping and I got it looking a litter better.


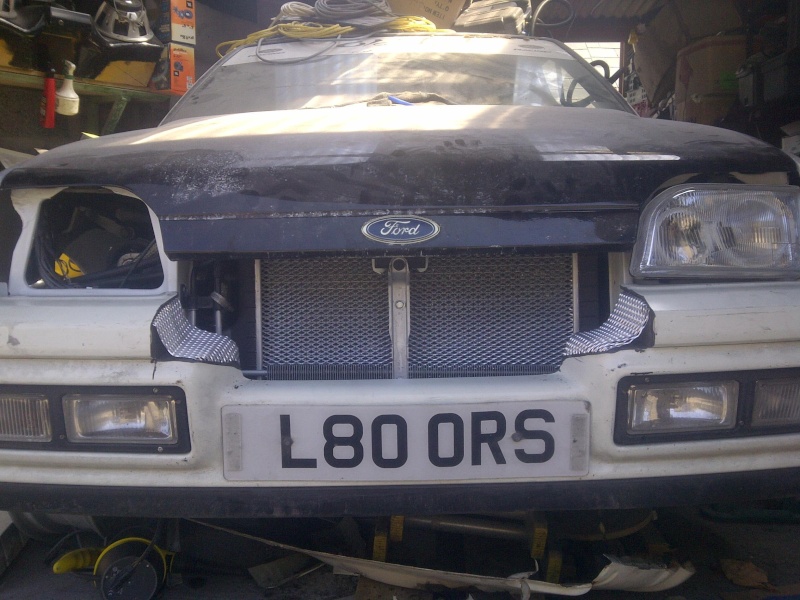

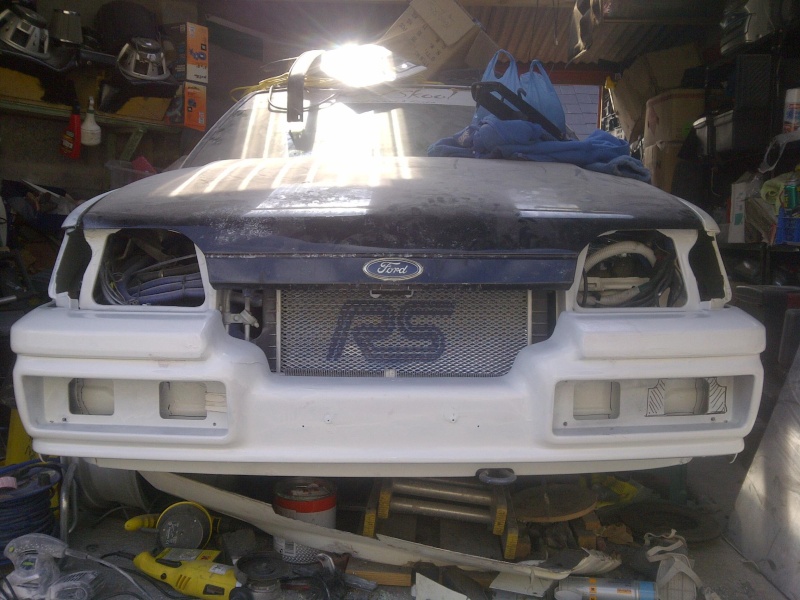
With the Bonnet Stay removed, It looks a lot better,. I grabbed some vent mesh that I had lying around and made a Radiator Cover Mainly for looks but as a bit of protection incase of anything flying into the now huge hole in the front of the car. I also Sprayed the RS logo for looks to.
So after the wing fitting and underseal of arches, I moved back into the engine bay. Stated off by cleaning up the Gear box.
As you can see, once I had soaked it in "GUNK" and panel wipe, I got out my mums Steam cleaner that she uses for the curtains (lol) and steam cleaned it all off. Then good old "HAMMERED BLACK HAMMERITE" couple of coats, and it looks as good as new.
I also gave the clutch arm a polish for good measure.
Nextup! Came the Air Flow. One of the problems I used to have was overheating, so along with the bonnet raisers and vent I wanted to get extra air into the engine bay.
as you can see, with the bonnet shut there is very little air flow to the radiator and oil cooler. So I got all gumpy about it and took out the angle grinder. Now there is plenty of air flow.
Once cut I needed to make it look a bit better, so wire meshing bondo and fibre glassing, alot of sanding and shaping and I got it looking a litter better.
With the Bonnet Stay removed, It looks a lot better,. I grabbed some vent mesh that I had lying around and made a Radiator Cover Mainly for looks but as a bit of protection incase of anything flying into the now huge hole in the front of the car. I also Sprayed the RS logo for looks to.
The Bishop- Posts : 91
Join date : 2012-05-22
Age : 48
Location : South Wales -
Re: Project FEZZ-STEN-STIEN
![]() by The Bishop Wed May 23, 2012 6:05 am
by The Bishop Wed May 23, 2012 6:05 am
Next Job, Custom Build Force Air Induction Inlet. I am planning on fitting a K&N Apollo kit to the car. As so I need to have a good direct front feed for air flow, without ruining the look of the car by drilling holes everywhere, I decided to fit it in the N/s fog light mount. This gives a flush look and I dont really need two fogs as i Still have the O/s one left fitted.
Being a total pikie and scrooge, I couldnt be bothered buying a proper Air duct so made one. Please see pics.


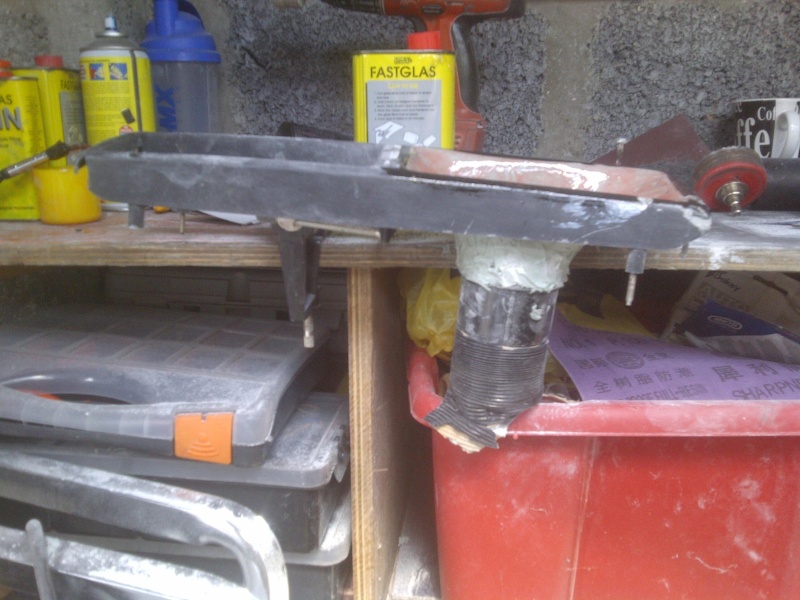
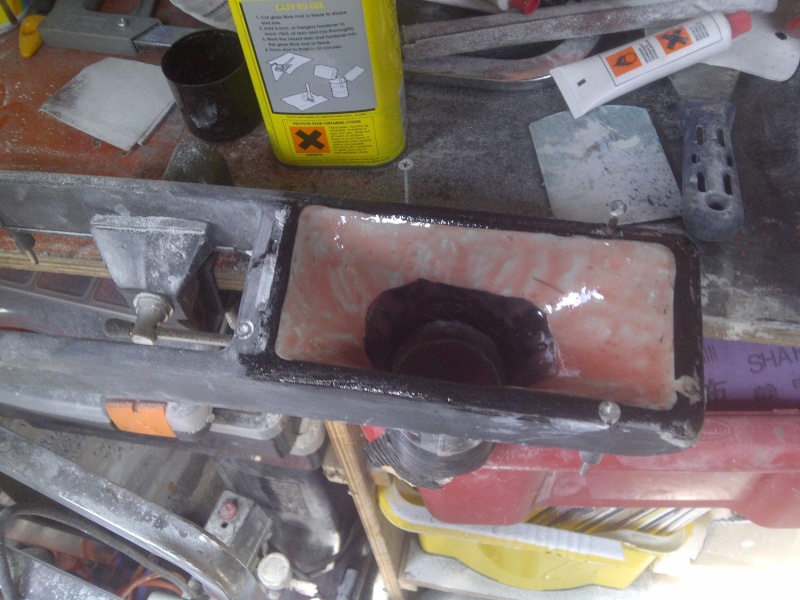

I think it looks cool. All I need now it the apollo off K&N and a new ducting pipe.
And for the Eagle eyed of you, YES IT IS A DRAIN DOWNPIPE!!!!!! £2-20 FTW
Being a total pikie and scrooge, I couldnt be bothered buying a proper Air duct so made one. Please see pics.
I think it looks cool. All I need now it the apollo off K&N and a new ducting pipe.
And for the Eagle eyed of you, YES IT IS A DRAIN DOWNPIPE!!!!!! £2-20 FTW
The Bishop- Posts : 91
Join date : 2012-05-22
Age : 48
Location : South Wales -
Re: Project FEZZ-STEN-STIEN
![]() by The Bishop Wed May 23, 2012 6:20 am
by The Bishop Wed May 23, 2012 6:20 am
Next up Engine Work.
Rewired everything, wrapped all wiring, Samco Silicone Tape on all hoses, Sheathed brakelines, repainted rocker cover, engine plates, suspension top mounts, Painted Exhaust Manifold, Made a Custome Galvanised Heat Shield, Custom Galvanised Plug Cover, plus more that I have probably forgotten. Re-timed the engine and fitted a new bosch alternator. Enjoy the pics, a few tweeks needed hear and there and a major part of the build to get done, but a battery and fluids and the engine should hopefully Fire for the first time in 5 and a half yrs.

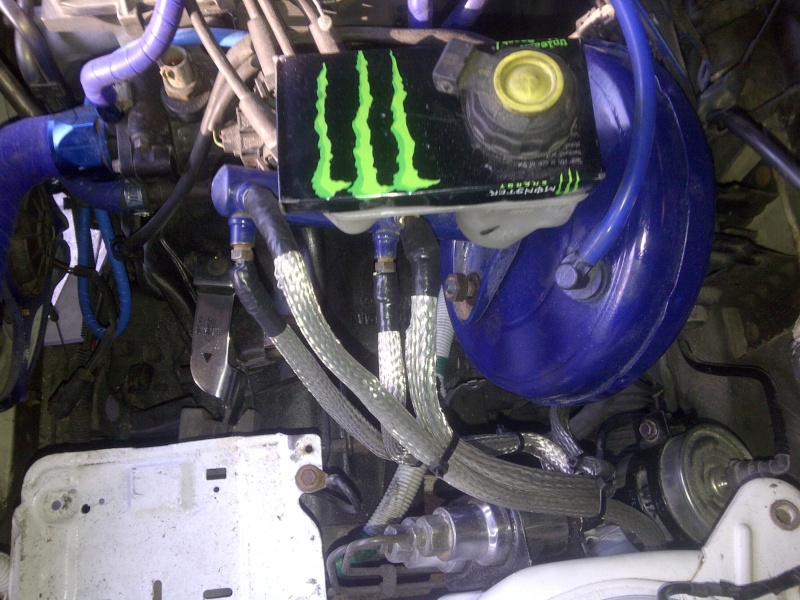


Also Pained up the Calipers hubs and front suspension legs, new discs & Pads to come and front end will be rebuilt. #gettinthere.
Thanks for reading.
Happy Modding
More to come / Long way 2 go!!!!!
The Bishop
Rewired everything, wrapped all wiring, Samco Silicone Tape on all hoses, Sheathed brakelines, repainted rocker cover, engine plates, suspension top mounts, Painted Exhaust Manifold, Made a Custome Galvanised Heat Shield, Custom Galvanised Plug Cover, plus more that I have probably forgotten. Re-timed the engine and fitted a new bosch alternator. Enjoy the pics, a few tweeks needed hear and there and a major part of the build to get done, but a battery and fluids and the engine should hopefully Fire for the first time in 5 and a half yrs.
Also Pained up the Calipers hubs and front suspension legs, new discs & Pads to come and front end will be rebuilt. #gettinthere.
Thanks for reading.
Happy Modding
More to come / Long way 2 go!!!!!
The Bishop
The Bishop- Posts : 91
Join date : 2012-05-22
Age : 48
Location : South Wales -
Had A nightmare Today
![]() by The Bishop Tue May 29, 2012 9:25 am
by The Bishop Tue May 29, 2012 9:25 am
Finally Me And Vanman and Jemma managed to turn the Fezz Around in th garage. That was when the world fell apart, even the Siezed rear drum wasn't as bad as when I Removed the Rear Bumper!!!!!!!!!!
View with Caution!!!!!


Are You Sitting DOWN!!!!!


View with Caution!!!!!
Are You Sitting DOWN!!!!!
The Bishop- Posts : 91
Join date : 2012-05-22
Age : 48
Location : South Wales -
Re: Project FEZZ-STEN-STIEN
![]() by Van Man Tue May 29, 2012 9:34 am
by Van Man Tue May 29, 2012 9:34 am
proper gutted for you fella. we seem to be getting somewhere and then this comes along!

Van Man- Admin
- Posts : 227
Join date : 2012-03-13
Age : 37
Location : Barry, South Wales -
Re: Project FEZZ-STEN-STIEN
![]() by The Bishop Tue May 29, 2012 9:49 am
by The Bishop Tue May 29, 2012 9:49 am
Just Another Job to add to the list. Just Glad I FOund It now and Not during an M.o.T. Found A Rear Rapir Skin for £55 just need new corners and rear crossmember. bit of welding and she will be fine. Lets Not forgret she is a 20 year old shell that has been sat in the same possition for 5 yrs. got to expect a bit of rust, and its only the original seams that have gone. steel in th panels is ok. Its mainly the edges that have gone.
The Bishop- Posts : 91
Join date : 2012-05-22
Age : 48
Location : South Wales -
Page 1 of 1
Permissions in this forum:
You cannot reply to topics in this forum|
|
|